


iPhone7拆机图解教程
新一代iPhone终于有了防水功能,IP67级别的防护让我们在诸如雨天或其他一些情况下使用手机时不再那么窘迫,对消费者而言无疑是一个很棒的消息。
新的iPhone会有哪些针对防水作出的设计,iPhone 7的拆解难度又如何呢?有好奇的童鞋们,一定不要错过。

iPhone7拆机
拆解的第一步,自然就是关闭手机。

iPhone7拆机 图1

iPhone7拆机 图2
卸掉尾插螺丝,将屏幕和背板的锁定解除。

iPhone7拆机 图3
随后要对手机进行一定的加热,以便分离屏幕与后壳部分。

iPhone7拆机 图4
使用吸盘吸起缝隙,然后用拨片两边滑动。

iPhone7拆机 图5
完全掀起屏幕后要稍加小心,这一次排线的方向有些不同,要从左侧打开屏幕。

iPhone7拆机 图6
断电(内部采用新的螺丝,Y型三角定制螺丝)

iPhone7拆机 图7
在断开屏幕排线之前一定要先将电池排线断开。

iPhone7拆机 图8
用螺丝刀拧下顶部的两个十字螺丝,断开前像头排线。

iPhone7拆机 图9

iPhone7拆机 图10
取下屏幕,将屏幕整板部分的排线与主板完全剥离。

iPhone7拆机 图11
取下两个主摄像头的固定螺丝。

iPhone7拆机 图12
1200万像素,支持光学防抖的主摄像头。

iPhone7拆机 图13
断开开机排线。

iPhone7拆机 图14
取下四颗天线连接器的固定螺丝。

iPhone7拆机 图15
取下天线连接器。

iPhone7拆机 图16
还有一颗固定螺丝,也一并拆下。

iPhone7拆机 图17
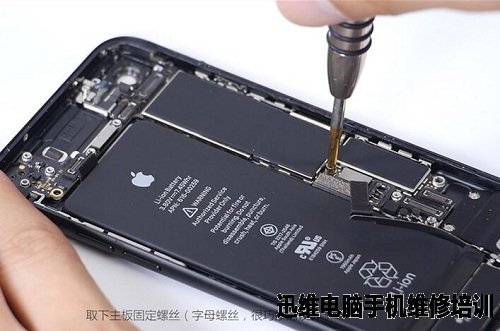
取下主板上的固定螺丝。

iPhone7拆机 图18
iPhone7拆机 图19
取下SIM卡托。

iPhone7拆机 图20
尾插排线挑开,注意下方的两个天线连接线也要断开。

iPhone7拆机 图21
将主板成功分离。

iPhone7拆机 图22
取下三颗Tapic Engine固定螺丝。

iPhone7拆机 图23
取下两个挡板上的固定螺丝,断开Tapic Engine排线,取下Tapic Engine。

iPhone7拆机 图24
拉出固定电池的两条易拉胶,取下电池,电池额定容量1960mA/h。

iPhone7拆机 图25

iPhone7拆机 图26
这里是扬声器部分。取下四个扬声器的固定螺丝,挑出射频连接线,取下扬声器。

iPhone7拆机 图27

iPhone7拆机 图28
取下尾插排线上的三颗固定螺丝,底部有两个固定螺丝,螺丝上贴有贴纸。

iPhone7拆机 图29
扬声器接口部分。

iPhone7拆机 图30
撕下尾插排线,尾插排线集成lightning接口、扬声器接口Tapic Engine接口、两个mic、射频连接线接口等。

iPhone7拆机 图31
取下左侧三颗音量按键固定挡板螺丝。

iPhone7拆机 图32
取下两颗开机键挡板螺丝。

iPhone7拆机 图33
拆下闪光的固定挡板。

iPhone7拆机 图34
取下开机排线。

iPhone7拆机 图35
取下三颗听筒挡板固定螺丝。

iPhone7拆机 图36
取下两颗听筒固定螺丝,就可以将听筒取下。

iPhone7拆机 图37

iPhone7拆机 图38
取下前像头排线。

iPhone7拆机 图39
取下四颗Touch ID固定挡板螺丝,断开Touch ID排线,取下Touch ID模组。

iPhone7拆机 图40

iPhone7拆机 图41
拆机部分硬件特写:

iPhone7拆机 图42

iPhone7拆机 图43

iPhone7拆机 图44

iPhone7拆机 图45

iPhone7拆机 图46

iPhone7拆机 图47

iPhone7拆机 图48

iPhone7拆机 图49

iPhone7拆机 图50

iPhone7拆机 图51

iPhone7拆机 图52

iPhone7拆机 图53

iPhone7拆机 图54
芯片解析

iPhone7拆机 图55
iPhone7拆解到此结束!附拆机所有硬件集合图:

iPhone7拆机 图56
上一篇: iPhone6经常无服务维修一例
下一篇: 联想B490不开机维修一例
 网站快速导航
学到熟练维修 需要多少钱?
 联系方式
联系方式

培训咨询
技术交流群
 培训科目
培训科目
- 新能源特斯拉维修培训班【实地】2026-03-17
- 无人机维修培训班【实地】2026-03-16
- 硬盘数据恢复2023-05-24
- 安卓字库修复课程(远程)2022-12-08
- 手机爆屏维修实地面授培训2021-09-02
- 自学维修基地——迅维课堂2017-06-14
- 安卓·苹果手机维修培训高级班【实地】2016-07-09
- 苹果手机、安卓手机维修培训(远程网络班)2025-12-19


